|
Catalog | Order | Support | Index | Contact | Home | ||||||||||
|
|
|
|
|
|
|
|||||||||||
| USA Relief | Tech Spec | Catalog | Guide | Download | License | |||||||||||
|
Catalog | Order | Support | Index | Contact | Home | ||||||||||
|
|
|
|
|
|
|
|||||||||||
| USA Relief | Tech Spec | Catalog | Guide | Download | License | |||||||||||
Online User Guide - Adobe Photoshop Using Mountain High Maps USA Relief
Colorizing MapsAll of the maps in the Mountain High Maps USA Relief collection come in four pre-colorized versions: Cartographic, Natural Look, High-Contrast and a Low-Contrast style. However, it is likely that you will need to create your own colorized map from scratch, and the grayscale state maps in the collection provide the perfect starting point. Most page layout applications allow you to apply a limited degree of coloring to a grayscale image, but if you require more extensive control over coloring, high-end image-manipulation applications, such as Photoshop, provide the best results.
Converting a Map Image to Color Mode
If you want to colorize your state map, you must first convert it to a color mode. Do this by choosing "RGB Color" from the "Mode" menu. Although images must be in CMYK mode for process color separation, use RGB mode while you work in color, even if you intend eventually outputting your map for process color separation--RGB is less demanding on memory than CMYK, thus operations will be faster. You need only change to CMYK mode prior to saving your image for the last time. MHMtip
CMYK PREVIEW IN RGB MODE
Working in RGB mode is less demanding on memory--thus faster--than in CMYK. However, if you intend converting your RGB image to CMYK mode for print separations, the colors in the image could change dramatically during conversion. To make sure that you view your map in the colors in which it will eventually print, use Photoshop's "CMYK Preview" feature ("View" menu) while working in RGB mode. This way you'll avoid any unwelcome surprises.Global Color Changes
There are several ways of achieving overall colors in Photoshop, and here we describe just three.
Color Balance
Hue / Saturation
- Choose "Adjust > Color Balance..." from the "Image" menu.
- In the dialog box that appears, use the sliders to choose a color, or enter values into the appropriate boxes. Make sure that the "Preview" box is checked, so that you can see changes as you make them. When you are happy with the color, click "OK."
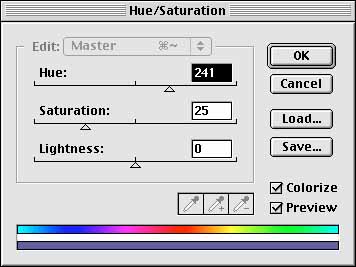
- Choose "Adjust > Hue/Saturation..." from the "Image" menu.
- In the dialog box, check the "Colorize" box. Make sure that the "Preview" box is also checked, so that you can see changes as you make them. Now use the "Hue" slider to change the color. The colors in the boxes at left will change according to the position of the slider. Use the "Saturation" slider to reduce the intensity of the color. Use the "Lightness" slider to make the color lighter or darker.
Of the many methods of colorizing a map in Photoshop, perhaps the most versatile is the "Hue / Saturation" command. With this you can either alter the hues of the precolorized maps, or you can apply overall color to the grayscale files by checking the "Colorize" box. Variations
Colorizing with Masks
- Choose "Adjust > Variations..." from the "Image" menu. This is a feature, introduced in version 2.5 of Photoshop, which allows you to make subtle changes to color, and comparing changes with the original.
- In the dialog box, click on any of the image rectangles surrounding the "Current Pick." Make sure that the "Preview" box is checked, so that you can see changes as you make them.
Photoshop's channels feature provides a very fast way of applying different colors to the land and ocean areas of a map image.
Giving the area outside the state map a different color
Giving the area outside the state a flat tint
- Open the grayscale version of the state map and change it to RGB color mode
- Apply your chosen color by using one of the methods described earlier. Try using "Hue / Saturation" with the "Colorize" option checked, and enter values of 45 for Hue, 70 for Saturation, and 0 for Lightness.
- Open the "Channels" floating palette by selecting "Palettes > Show Channels" from the "Window" menu. Click on the right-pointing arrow at top right of the Channels palette and select "New Channel."
- In the dialog box which appears, name the channel "State mask" and click "OK." The map image window will now go blank, this being an "empty" new channel.
- Open the corresponding state mask for the map you are using, and choose "All" from the "Select" menu.
- Choose "Copy" from the "Edit" menu, and close the state mask window.
- The state grayscale map window showing the blank channel should now be active (if not, just click anywhere on it). Choose "Paste" from the "Edit" menu. This will paste the map mask into the blank channel.
- Make the colored state base map channel visible by clicking on the word "RGB" in the Channels palette (or type Command-0 / Ctrl+0).
- Choose "Load Selection" from the "Select" menu. In the dialog box which appears, select "State mask" from the "Channels" pop-up menu, and check the "Invert" box. Click "OK."
- Choose "Adjust > Hue/Saturation..." from the "Image" menu. Check the "Colorize" box, and choose a color for the area outside the state by using the slider controls. Click "OK."
Selective Coloring
- Open the grayscale version of your state map image and change it to RGB color mode
- Apply your chosen color by using one of the methods described earlier.
- Define a background color: click on the background color swatch in the tool palette, and use the color picker or custom colors option to select a color. This will be the color used for the area outside the state territory.
- Open the "Channels" floating palette by selecting "Palettes > Show Channels" from the "Window" menu. Click on the right-pointing arrow at top right of the Channels palette and select "New Channel."
- In the dialog box which appears, name the channel "State mask" and click "OK." The map image window will now go blank, this being an "empty" new channel.
- Open the corresponding mask for the state map you are using, and choose "All" from the "Select" menu.
- Choose "Copy" from the "Edit" menu, and close the state mask window.
- The state map window showing the blank channel should now be active (if not, just click anywhere on it). Choose "Paste" from the "Edit" menu. This will paste the map state mask into the blank channel.
- Make the colored state map channel visible by clicking on the word "RGB" in the Channels palette (or type Command-0 / Ctrl+0).
- 10 Choose "Load Selection" from the "Select" menu. In the dialog box, check the "Invert" box. Click "OK."
- Press the Delete key. This will delete the area outside the state territory of the image to reveal the background color that you defined in step 3.
Photoshop provides a number of tools for colorizing, but the most useful for selectively coloring Mountain High Maps USA Relief is the lasso tool.
Using the lasso tool
You may want to give the area outside the state multiple colors, as you did for the state land relief. If so, before pasting the Clipboard contents into your selection (step 16), create a new document (choose "New" from the "File" menu, then press "OK" in the "New" dialog box--the new document size will be exactly the same as the most recently copied selection), and paste the non-state area into it (press Command-V / Ctrl+V). Alternatively, use the Layers feature of Photoshop to store the state land areas, while you colorize the area outside the state. Do your selective coloring in exactly the same way as described in steps 11 to 14--but using different colors! When done, copy the area outside the state (press Command-A / Ctrl+A, then Command-C / Ctrl+C), and execute steps 15 and 16 above.
- Open the grayscale version of your map image and change it to RGB color mode.
- Open the "Channels" floating palette by selecting "Palettes > Show Channels" from the "Window" menu. Click on the right-pointing arrow at top right of the Channels palette and select "New Channel."
- In the dialog box that appears, name the channel "State mask" and click "OK." The map image window will now go blank, this being an "empty" new channel.
- Open the corresponding state mask for the map you are using, and choose "All" from the "Select" menu.
- Choose "Copy" from the "Edit" menu, and close the state mask window.
- The state map window showing the blank channel should now be active (if not, just click anywhere on it). Choose "Paste" from the "Edit" menu. This will paste the state map mask into the blank channel.
- Make the state map channel visible by clicking on the word "RGB" in the Channels palette (or type Command-0 / Ctrl+0).
- Choose "Load Selection" from the "Select" menu. In the dialog box which appears, select "State mask" from the "Channels" pop-up menu, and check the "Inverse" box. Click "OK."
- Making sure that the background color is set to white, choose "Cut" from the "Edit" menu (or press Command-X / Ctrl+X). This copies the area outside the state to the Clipboard, leaving just the actual state land relief visible. Although it is not absolutely necessary to remove the non-state area (you can use the "Layers" feature of Photoshop for storing areas of map you don't want to affect), doing so makes selecting land areas a lot easier.
- Apply your chosen color to the land relief by using one of the methods described earlier.
- Double-click on the Lasso tool in the Toolbox. This will reveal the Lasso Options dialog box. Enter a value into the "Feather Radius" box--the bigger the number, the more gradual the feathering.
- Now use the Lasso tool to select an area of land relief on your map.
- Use your preferred method of defining a color. Try using Hue/Saturation to define an ochre color, with values of 50 for Hue, 70 for Saturation, and 0 for Lightness. Save your color settings by clicking the "Save..." button in the dialog box, so that you can apply the same color to other parts of your map, if necessary.
- Again using the Lasso tool, select an area of land relief within the area you selected in step 12. Define a color and save it for later use. Try using Hue/Saturation to define a purple color, with values of 30 for Hue, 70 for Saturation, and 0 for Lightness.
You can go on building up multiple layers of color by using the above technique.
- You may now want to put back the area outside the state, which you copied to the Clipboard in step 9: Choose "Load Selection" from the "Select" menu.
- Choose "Paste Into" from the "Edit" menu. The area outside the state, in gray, will appear. You may now want to colorize the non-state area.
- Again, choose "Load Selection" from the "Select" menu. Use your preferred method of defining a color. Try Hue/Saturation to define an blue color, with values of 160 for Hue, 80 for Saturation, and +70 for Lightness. Save your color settings so that you can apply the same color to other maps.
Isolating the state land mass
Using the state mask in Photoshop provides many possible options in preparing a state map. The state mask can isolate the state land area from any of the four colorized state maps and copy the image to a pre-prepared texture image.
Making additional masks
The state mask can be used to generate a drop shadow mask image which in turn can be used as a mask to create a fading out surrounding land area or to accentuate the state land mass by providing a peripheral shadow with de-emphasized surrounding relief.
The Illustrator EPS layers can be used to create a new range of corresponding state masks. Open the EPS file and delete the unwanted layers, and save the remaining layer as an EPS file. Open the EPS file in Photoshop and rasterize the file at 300 dpi to generate a bitmap image - this can be inverted if necessary. Using this example, to select a county from the map, fill the area outside the desired county with black so that the only area left in white is the selected county. Save this file as a bitmap and use as a mask to select colorized land in a similar procedure to using the state mask.

USA Relief Maps ~ Digital Wisdom Inc ~ PO Box 11 ~ Tappahannock VA 22560 ~ USA
800-800-8560 | 804-443-9000 | Email
© Digital Wisdom, Inc.
Any comments or problems with this site? Please let us know - thank you!